Monday, September 25, 2023

Collab Opportunity


Hello,


My name is Louis, I'm the Co-Founder and Head of Content at Blurry Marketing. 


I came across your site and I think I have some great content that I could contribute to your audience. Below are some SEO-optimised blogs that i've written, would you be interested in publishing any of them on your site?

  • Sydney vs. Melbourne: Which Australian City Offers the Best Opportunities for Property Flipping?
  • How Millennials Are Transforming Property Flipping in Australia
  • The Australian Property Flipping Boom: Strategies, Risks and Rewards in 2023

These topics align well with your website, and the articles are all we-researched and optimised for search engines.


Let me know if you're interested in collaborating.

Thanks,
Louis


Louis O'Neill
Co Founder & Head of Content
P: 0404 273 329
W: blurrymarketing.com

Thursday, December 6, 2018

Sunday, April 22, 2012

Monday, May 16, 2011

GRUB'd

In my last post, I talked about how I had built my dream computer with two hard drives, each with it's own Operating System (OS). One is Windows 7 and the other is Ubuntu. At that point I was using the Basic Input-Output System (BIOS) to select the hard disk with the OS I wanted to load, and one of my future goals was to figure out how to add Windows 7 into the GRUB bootloader which is used for Ubuntu.

I accomplished that goal last night. I did some research first, searching for articles on how to set up GRUB to point to Windows 7. I read three of them and they all talked about editing a file named "menu.lst". I wrote down the syntax for adding Windows 7 to this file, booted into Ubuntu and proceeded to conduct a search for "menu.lst". It was not to be found. Not to be deterred, I started poking around.

In the articles I had seen a reference to the path "/boot/grub". I opened a terminal window and changed directories to that location.

There I saw a file named "grub.cfg" I opened it up with vi and this is what I saw.

This gave me the necessary bits of information I needed. I first proceeded to "/etc/grub.d", which is a directory.

I used vi to read the "README" file. Based on that, I was able to determine that I should edit the "40_custom" file. I used the command "sudo vi 40_custom" to edit the file. Using the "sudo" command temporarily elevates your privileges to that of root, which is the owner of these system files.

I used the syntax I had learned from the articles to add the entry enclosed in the box above. I then proceeded to the directory "/etc/default".

Once again, I used the "sudo" command to edit the file "grub" (sudo vi grub). I knew from the articles that the menu items index in GRUB starts at zero. Since I already had four entries on the existing GRUB menu list, I knew my new entry would be the fifth one, or number 4 with a zero-base count. I wanted to set Windows 7 as the default, so I set the default entry to 4.

After making that change, I ran the "update-grub" command as specified in the "grub" file, again using sudo: sudo update-grub. After that, I rebooted and was very happy to see Windows 7 as the last item on the list and highlighted as the default option.

I do have to say that I'm not positive adding the Windows 7 entry to the "40_custom" file actually did anything. In my entry, I set the title to "Windows 7". On the GRUB menu list it displays as "Windows 7 (Loader)". I don't know if GRUB added that last part to my entry or whether I could have saved myself the trouble of adding the entry and just run "update-grub" and it would have picked up Windows 7 itself. It's working great, so I'm not going to tinker with it. But let me know if you try that option and it works for you.

P.S. I wrote this entire blog post in Firefox on Ubuntu, using a screen capture tool called Shutter. How's that for open source?

Wednesday, May 4, 2011

A Dream Realized

For many, many years now, I've had a dream. That dream was to build my own desktop computer. The time was never right from a budget standpoint - there was always something that was a higher priority. Well, this year, the time was right. We are out of debt, with the exception of the mortgage. We have our six months of expenses saved up (Dave Ramsey would be proud). It was finally time.

So with the go ahead from Stephanie, I began my research in late February. For those who don't know me, I'm big on research. I want to make sure that I get exactly what I want, for the price I want. There was research on the how-to for things like installing a processor and applying thermal grease. There was research to answer questions such as AMD vs. Intel and two mid-range graphics cards in SLI or Crossfire vs. one higher end graphics card. And then of course there was the price comparison research. By early April I had determined what I wanted and what I was willing to pay for each component. Within a couple of days I had purchased all of the components and was waiting eagerly for them to arrive. In the spirit of full disclosure, there were a few items I had already purchased previously to be used with "my computer" when it actually came to be. I've disclosed those below. On Saturday, April 16th the last component I had purchased arrived. That evening, after my kids were in bed, I began to realize my dream; I began to build.

The Components


In Progress
The beginning

Processor installed

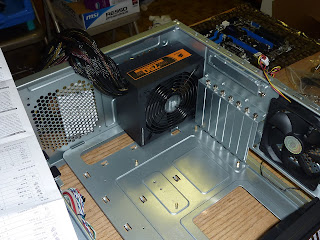
PSU installed

Motherboard with processor, heat sink and RAM installed

Almost done! All components installed and Windows 7 install in progress. The thing with the three red stripes is the graphics card.

The other side of the case; you can see some of the cable management I tried to do and the two SATA drives

Windows 7 has been installed and is preparing for first time use

Completed!
Here it is, set up completely. The speakers are from a previous desktop computer.
Isn't it beautiful?

Rambling Thoughts About the Build and the Components
  • I went with a new Sandy Bridge Intel processor because it had great reviews and was supposed to be good with gaming. I chose the Core i5-2500K because it is unlocked for overclocking. Though I have not tried to overclock yet, I will.
  • I decided to go with one more expensive graphics card over two less expensive cards due to the fact that not all games are optimized for or even utilize a dual graphics card set up. If I want to next year, I can always add a second one. There's room on the board, in the case and on the PSU.
  • I went with the Radeon 6950 because it is supposed to be easily upgraded to almost the level of the next higher card, the 6970, with a GPU BIOS hack to unlock two unused shaders. I have not done that yet either but I plan to. It can also be overclocked. By the way, the graphics card was huge.
  • The processor heat sink was huge, a lot bigger than I thought it would be. Thankfully my case is big enough that it was not an issue.
  • Locking the processor into place took more force than I had anticipated. I was a little nervous at first and pulled it out to inspect for damage. I had done it right, so there was none.
  • The motherboard has two 6 GB SATA connections and four 3 GB SATA connections. I used the two 6 GB connections for the two hard drives. Three of the four remaining are taken up by the optical drive, the front panel e-SATA connection and the e-SATA connection on the Rosewill All In One card reader. That leaves one for the future, possibly a Blu Ray drive.
  • Once I got Windows 7 Ultimate installed and the PC hooked up to my router, I was surprised to find that it did not have generic Ethernet drivers. I could not connect to the Internet to download drivers and software. And the CD of drivers that came with the motherboard was unreadable. So I had to download the Ethernet drivers onto a USB drive using my wife's computer and install them that way. Once installed, it connected right away. Interestingly, when I installed Ubuntu, it was able to immediately use the Ethernet connection. Point to Ubuntu.
  • Right now I am dual booting using BIOS to determine which hard disk to boot to. At some point in time I will research and figure out how to configure GRUB to point to Windows 7 as an option and just boot to the Linux drive all the time.
  • Dealing with the extra power cables on the PSU was an issue. I eventually just coiled them at the bottom of the case. I can see how a modular PSU would be an advantage there.
  • I chose Windows 7 Utlimate Edition because I wanted to be able to use the Windows XP mode, to provide as much backwards compatibility with programs I already have as possible. I've tried it with a favorite game of the kids, Crazy Machines 2, with no luck. I'll have to try again now that I've updated both the Windows 7 and the virtual Windows XP.
  • For the mouse and keyboard I went with Logitech because I've had great experiences with their products in the past. I choose the two I did for three reasons: 1) They were both wireless, 2) They both support Logitech's "Unifying" technology, which means they can both use the same USB receiver, and 3) They both had mail-in rebates :).
  • Getting all the little connections for power button, hard drive LED, etc. hooked up was pretty intimidating/confusing. I got it right though.
  • I'm not a hard core gamer but I do like to play games occasionally, so I wanted a computer that would be able to play any games that come out in the next few years. That's one reason for choosing the level of graphics card that I did.

Conclusion
I thoroughly enjoyed building this computer. It probably took me quite a bit longer than someone with experience because I was learning and because I triple checked everything. I cannot tell you how excited and relieved I was when I pressed the power button for the first time and it actually booted up to BIOS. And now that I've had the computer a couple of weeks, I can say that I am very pleased with it and am happy to have my own computer, instead of having to steal occasional time on my wife's laptop.

My dream has been realized!

P.S. Anyone need help building their PC? I'd love to assist :).

Thursday, January 27, 2011

You know there's been too much snow when...

  • It's no longer "shovel, throw, shovel, throw" but "shovel, walk, throw, walk back".
  • You wish you'd bought a snow blower when you moved in 8 years ago.
  • Your property begins to remind you of Superman's Fortress of Solitude.
  • You begin to question the sanity of people who live even further north who get even more snow every year (they must have bought a snow blower when they moved in).
  • Your dad starts to call every time there's a snow storm to remind you that he does not even own a snow shovel or an ice scraper where he lives. Thanks Dad.
  • You hope they'll start the Olympic sport of Snow Flinging because your sure you'd make the US Team.
  • You wish were living in a dwelling where you were not the landlord responsible for keeping the drive way and walks clear.
  • The only thing keeping you from hiring someone else to do it is pride - all the neighbors around you shovel their own driveways.
  • You try thinking of shoveling as water resistance training - part of your New Year's resolution to get into better shape.
  • You wished your house had a two car garage used for parking the vehicles in, and you owned a snow blower.
  • You've been shoveling long enough to think up all of these reasons it's been snowing too much.

Thursday, September 16, 2010

Accountability to God for what He has revealed

Deuteronomy 29:29 (New Living Translation)

29 “The LORD our God has secrets known to no one. We are not accountable for them, but we and our children are accountable forever for all that he has revealed to us, so that we may obey all the terms of these instructions.


I read this during one of my quiet times this week and it really caught my attention. We will be held accountable for what God has revealed to us in His Scriptures. That can be a very uncomfortable, and unwanted, responsibility. Don't we all like to do our own thing? Yet, as Peter said in John 6:68, "Lord, to whom shall we go? You have the words of eternal life."

Monday, September 13, 2010

Funny video: Dad Life

I first saw this on God Tube and thought it was funny. I could not figure out how to embed it from there. So I'm embedding the YouTube version. Here's the link to the God Tube one: http://www.godtube.com/featured/video/dad-life